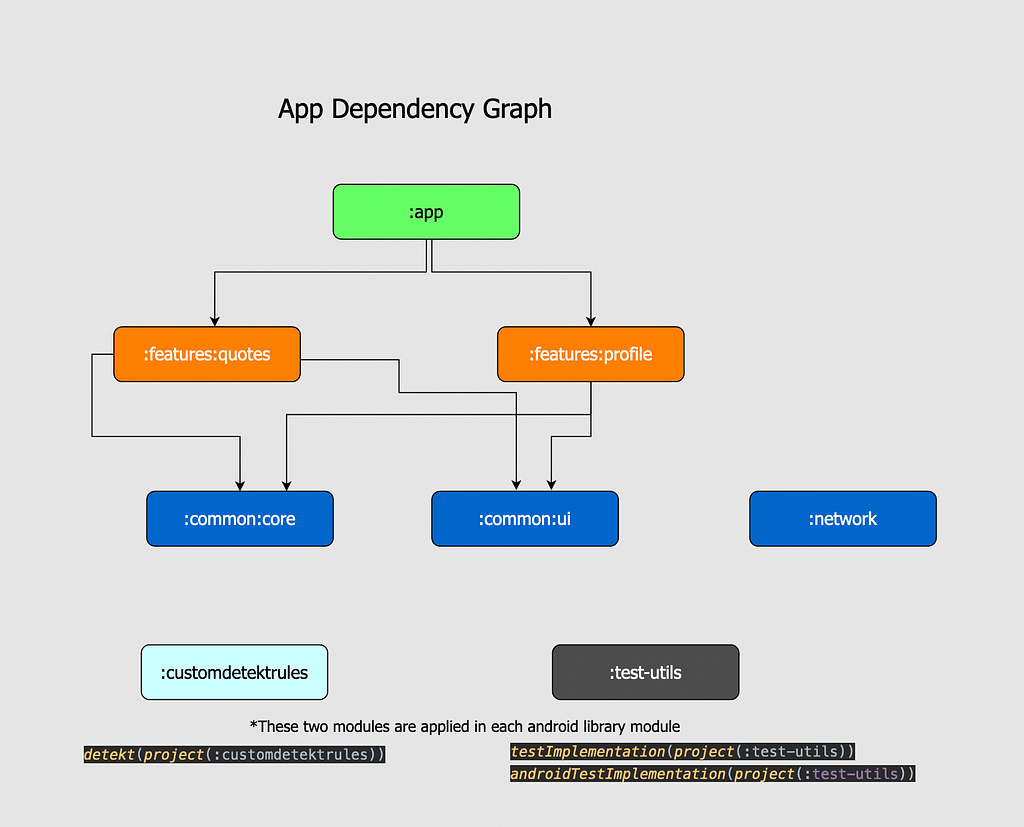
In this article, I will talk about the process and tools that I used while refactoring the Quotes project into modularization.
You can look up for source code in GitHub:
https://github.com/mirzemehdi/quotesapp
- mvvm branch -> Initial version written in mvvm pattern
- clean-architecture-layered branch -> Second refactoring from mvvm to clean architecture (creating UseCases, and separate modules (domain, data, presentation).
- main branch -> Final refactoring using modularization (separating domain, data presentation layers as a package inside each feature module)
I started a Quotes app using the MVVM architecture pattern. However, after learning about Clean Architecture, I decided to refactor the project to use that instead. At first, I had no knowledge about Clean Architecture, so it seemed overwhelming to me. But as I learned more, it seemed like an exciting challenge because you see the project as a building so you feel like an architect :D. I discovered that most projects use domain data presentation structure as top layer so-called layer architecture. So, after gaining some knowledge, I started refactoring the MVVM architecture to Clean Architecture in the same way. It wasn’t difficult because the code was already clean. But in fact this layered-architecture “doesn’t scream architecture” of the project. I’d advise you to check out this article of Gabor Varadi for better explanation: https://proandroiddev.com/structural-and-navigation-anti-patterns-in-modularized-android-applications-a7d667e35cd6.
There are different ways to structure a project using Clean Architecture, such as separating it by layer or by feature. Each method has its own pros and cons, which I won’t go into here, but there are many articles about it that you can read. You can check out this one: https://proandroiddev.com/multiple-ways-of-defining-clean-architecture-layers-bbb70afa5d4a
Another method is called feature+layered structure, where you separate the project by features, and within each feature, you create layers. It’s like a big project made up of small projects. As I was doing this, I also wanted to improve my TDD (Test Driven Development) skills, so I decided to write tests first while separating the features. However, I encountered some problems, such as how to communicate between features without creating circular dependency injection. I will discuss about these problems and solutions in future articles.
As I mentioned before, the task of refactoring to modularization seemed overwhelming to me at first, and I wasn’t sure how I would solve the problems that I had encountered. But I remembered something I had heard before from TEDx: “When you’re faced with a problem, break it down.” So, that’s what I did. I broke the task down into smaller parts and focused on making small modifications to the code first, gradually improving it over time. This is a strategy that I often apply in real life when faced with a problem, and it helps me to make progress.

Almost every project requires some form of network access, so I decided to create a network module to be independent of any other module first and see what problems I would encounter. While creating this module, I wanted to achieve 100% test coverage (I wasn’t able to reach that goal in the end anyway :D). For this purpose before even writing some functions, I included Jacoco library in the project to generate test coverage reports so that I could quickly address any areas of the code with less than 100% coverage.
As I started developing the network module, I realized that I also needed to change all of the Gradle files to use the Kotlin DSL. This made it easier to manage dependencies, as I could only add the modules that were actually required. Within the network module, I created a Retrofit instance to provide easy access to API services. To check network connectivity, I created a new class. However, I faced difficulties while testing it. Initially, I thought of mocking each method, but then I realized that it would only replicate the source code. This is when I saw the real benefits of the Robolectric test framework, which creates shadow classes for Android internal classes, allowing me to simulate network problems during testing. While working on this project, I also learned about BDD (Behavior-Driven Development) and decided to incorporate it into my development process. Before, I had been using JUnit4 for my unit tests, but I found that it made the tests less readable. So, I switched to JUnit5 to improve the readability of my tests, and we can write BDD tests with JUnit5 easily. Tests should be readable as much as possible since they are considered documentation for the project.
The next step was to implement static code analysis checks using tools such as Detekt and Ktlint. As the sole contributor to the project, it was easy for me to check and format the code style before pushing it to GitHub. However, if I were to make this project open-source, other developers would also be able to contribute. To ensure that they also follow code style guidelines, I included CI/CD pipeline using GitHub Actions, as the code was already on GitHub and it was easy to set up. This way, if there were any issues with code style, GitHub Actions would fail before I merge the code to the main branch. To reduce the number of unnecessary commits related to code style, I also implemented a Git pre-commit hook, which checks code style locally before each commit and only commits if everything is correct. However, it is important to note that this does not mean that code style checking should be removed from the CI/CD pipeline, as someone could easily skip this step locally by using the “git commit — no-verify” command.
After setting up the test coverage report, code style checking, and CI/CD pipelines, I started developing new feature modules. Knowing that these modules will be written using Clean Architecture style, I organized them as packages within the module level, rather than separate modules. However, I still needed to ensure that these package-level layers follow the principles of clean architecture, such as preventing imports from the data layer in the domain layer or allowing the presentation layer to only import the domain layer. To accomplish this, I added new custom Detekt rules to enforce these principles.
Before starting the development of feature modules, I created a core module. This module contains core objects that can be included in every android library module, such as the Result or ErrorEntity classes. I also created a UI layer for sharing common code related to the main styling, coloring, and theming of the project, which also includes some UI helper classes. I could have implemented this layer as an API in the core module (since each feature module includes a core module), but the problem with this approach is that if there is a module that does not need to include the UI layer, it would not be good modularization. Because for some feature modules I would separate into API (usually containing the domain layer) and implementation modules for better modularization, if I wanted to share common classes between feature modules.
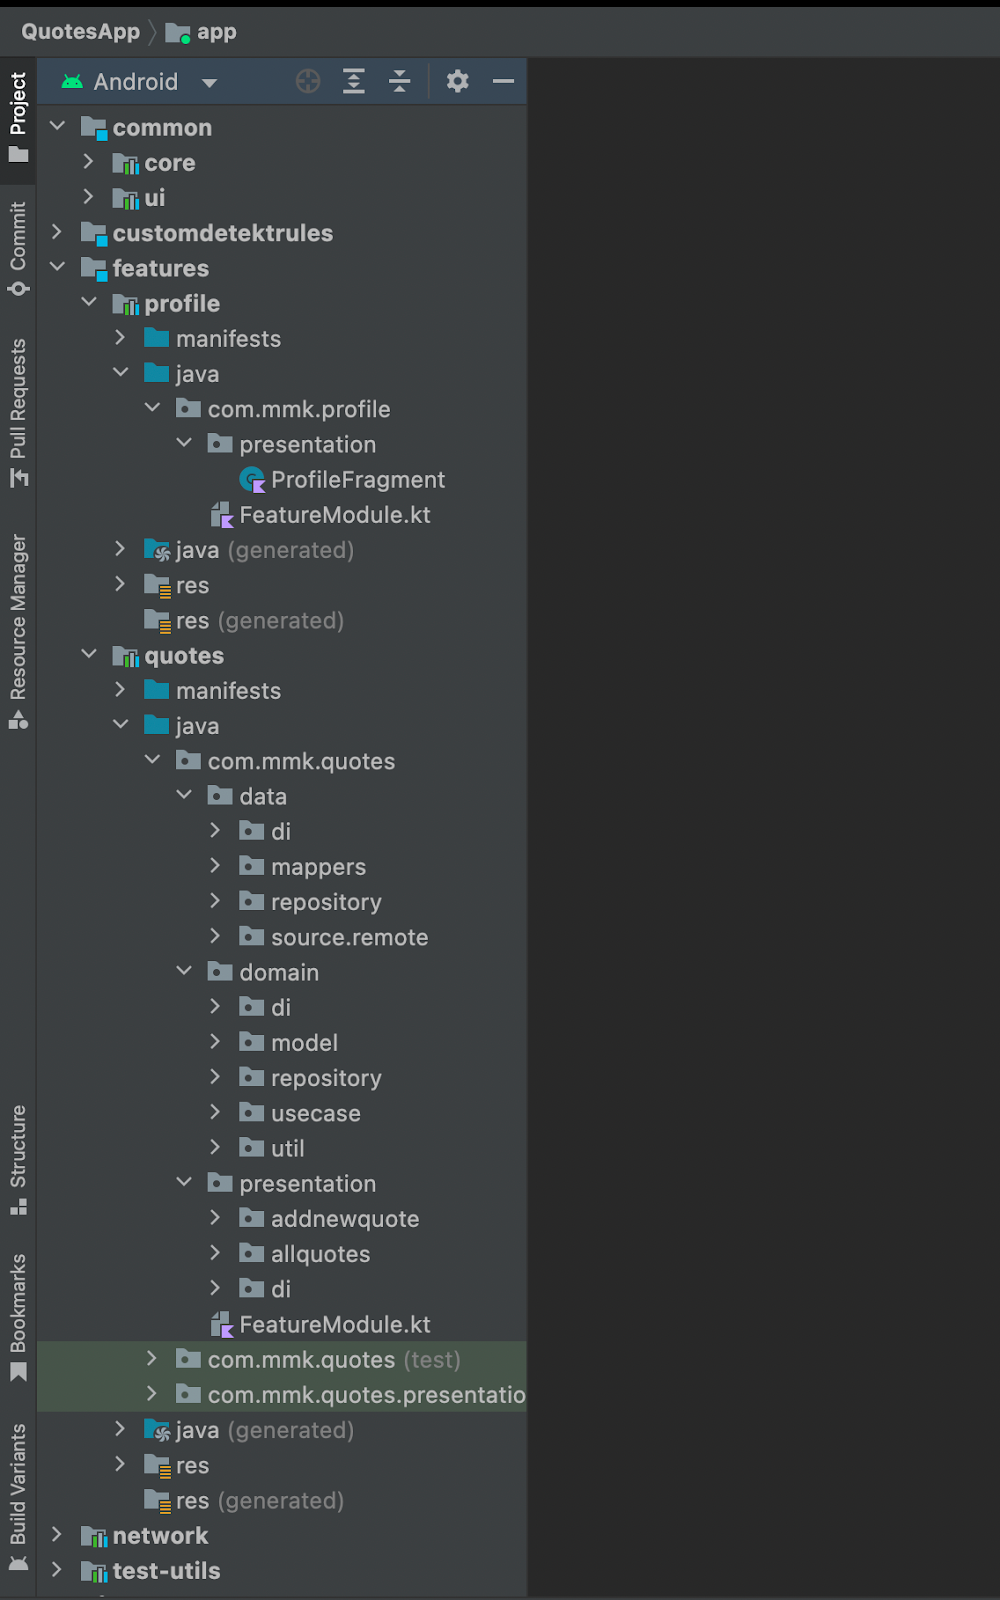
Here is recap of project structure in Android Studio.

When looking at the data layer of the quotes module QuotesRepository, QuotesRemoteDataSource, and QuotesApiService may seem to be doing the same thing, but they serve different purposes. QuotesRepository decides where to get data based on internet connection or configuration. QuotesRemoteDataSource and QuotesApiService are a bit more similar though. At first, I thought that I would keep all remote-related code in QuotesRemoteDataSource and this would be enough, but as I implemented the project, I realized that it would be better to separate these classes. For example, if I needed to get network data from Firebase, and then tomorrow I decided to change it to Retrofit, almost all parts of QuotesRemoteDataSource would have to be changed. This is not what I wanted when I implemented the project using Clean Architecture. Clean Architecture should make it easy to change parts of the project. Therefore, by separating these classes, in the future, if I want to change Firebase with Retrofit, I will only have to change the part where it gets raw data. QuotesApiService is only responsible for getting data, it doesn’t do anything based on network response code or errors. It is QuotesRemoteDataSource’s responsibility to decide what to do based on success or error, and what to pass up to QuotesRepository. And when I change Firebase to Retrofit, I will only have to change QuotesApiService (by adding some annotations), and on top of that this class also helps to separate some ugly code of Firebase code from the main part of QuotesRemoteDataSource. QuotesRemoteDataSource shouldn’t care what framework gets the data, it should only react to what to do with network response codes.
And one final tip, while developing the ViewModel, I realized that in order to create an observable object for the view in the ViewModel, I had to create a MutableLiveData and a Livedata of the same object over and over again. To make this process easier, I created a live template in Android Studio that does this for me automatically. All I need to do is give the property name, type, and default value (if there is one). You can add this live template to your Android Studio too :).
private val _$NAME$ = androidx.lifecycle.MutableLiveData<$TYPE$>($INITIAL_VALUE$)
val $NAME$: androidx.lifecycle.LiveData<$TYPE$> = _$NAME$
So that was my journey with the quotes app, from MVVM to Clean Architecture, all the way up to modularization.
